I have written about my Mile End renovation in this space before (see parts 1, 2, and 3 for a refresher) but looking back, my last entry about this project was in May 2014. MAY 2014. MAY!!!???? Holy smokes. The renovation was more or less finished last June/July. Then I ran off to get married. Then I wanted to give the clients time to settle back in. And then I wanted to get a professional in to take pictures. My website pictures have all been taken by me up till now and well, it was time to hang with the big kids and go a little more pro.This all apparently took 8 months give or take. I think that now, today, with Spring sorta kinda upon us, this is a perfect time to reveal one of my most favourite renovations to date. Not because it was the fanciest. I’ve done fancier and much less fancy in my lifetime. Not because it was the easiest. It wasn’t. Not because I really love these clients and they were a joy to work with. They were, but that’s not the reason. It is because I felt like I was changing someone’s life. It’s not saving a life by any means, it isn’t even that important in the scheme of things. But it is the renovation I’ve done that feels like it has had the most impact on a family’s life- we took them from a life lived in separate rooms to a big, open, spectacular space. We brought in more light, more colour, and more functionality. Also I really dig the design. Good design can change your life people!
Here is what it originally looked like:


The new floor plan:

Without further ado, here is the big reveal:
Mudroom
We knocked the wall to the left of the entrance down, took over part of the former playroom and turned it into a mudroom. So now instead of walking into a tiny vestibule between two doors where there wasn’t even room to put shoes or boots or even coats, you walk in and to the left is this:


I designed the storage to work as well as possible for a family of four: closed storage above the new closet, sliding doors for easy access, hooks and baskets and a bench to get your boots on. There is enough room to bring the stroller or scooter or bike in. And I still love the tile from the Bouroullec Brothers for Mutina.
Powder Room
The other half of the former playroom was halved again to make the powder room and laundry room. Here is the new bathroom:


I chose a pretty neutral & small floor tile, a wall mounted toilet and a sink with a thin and light base, all in the interest of making the tight space seem bigger. I had a built-in made for extra storage. And then we had a crazy cool tile installed on the wall for a touch of fun. I love this little space!
Laundry Room
As mentioned above, the former playroom was cut into 3 to make a mudroom, a powder room and a laundry room. Formerly housed in the same room as the bathroom, I wanted to give my clients a dedicated laundry and storage space so that each area has its own dedicated purpose. Also your guests don’t want to see your dirty clothes when they go wash up before dinner!


The yellow door off of the kitchen leads you to the laundry room. Plenty of room for storage,washing and drying. I used my beloved Chicago penny round tile for the ironing board wall. The small grey tile repeated here on the floor, the grey appliances, and grey cabinets are made so much more interesting by the pops of yellow and red.
Living Area
This is what you see when you walk in now: space! Beautiful wide open space.


I want my clients to paint their coffee table and get some cushions and get a rug and hang some art. That’s coming up. But for now, holy cow, what a great, light-filled space.
The Kitchen
Working once again with Steam, I think we came up with a gorgeous, timeless, dream kitchen space.


Grey cabinets, white quartz counter tops, gorgeous marble backsplash, steel painted black for behind the stove, a big old chunk of wood “resting” on the island with a black steel base, prep space, tons of storage, and a lovely little built-in bench that is the sunniest spot to have a cup of tea and read the paper or to snuggle up with a little one and read stories. The brass handles and the yellow light are extra details that make it all just work together so well. As my son would say:” I don’t like this kitchen. I LOVE IT!”
Dining Area
Across from the kitchen and right next to the big new window, is the dining area. We can’t talk about rooms when there aren’t any 😉 .
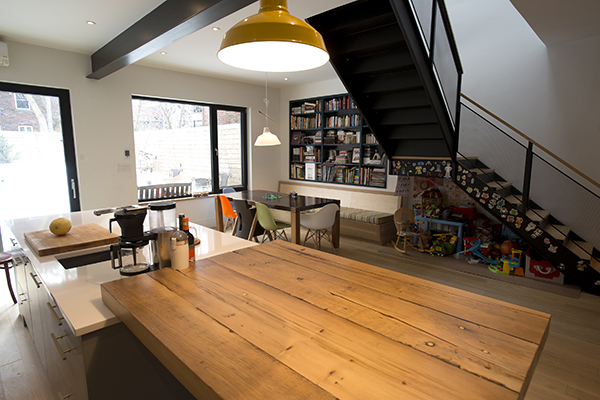


The clients have kept their old table (for now) and added colourful chairs to go with the color pop theme. I had a bookshelf built-in and painted a gorgeous peacock color. We designed a built-in bench in Russian Ply with storage for all of the legions of toys. The light is from West Elm and it’s hardware is brass to refer to the kitchen drawer handles. The fabric for the bench is a multicoloured stripe indoor/outdoor fabric that I’ve used a couple of times before, including on my own dining room chairs. Spills wipe right off. Under the staircase is kid world: so mom and dad can enjoy a glass of wine at the table, and kids are close by.
Pretty, functional, and a great spot for a meal or some Lego building.
The Stairs
We ripped out the original stairs that were blocking off so much space and so much light, and instead of coming into the middle of the space and facing a wall, the new stairs are tucked against the wall and you come into the wide open space.


As stunning as they look and as much as I love the design, these stairs were hands down the biggest stress on this entire project. To save some money and because we liked the guy, we went with a welder used to building exterior metal staircases when we should have gone with a regular staircase person. The stairs were eventually over budget so we didn’t save any money and a couple of dumb mistakes were made. And yet they are strikingly beautiful. Lesson learnt: if you are going to have a statement piece of furniture made, don’t try to get a bargain.
And now a word about interior design photography. Doug Hollingworth took these reveal pictures. Pretty, right? Zen and minimalist and light filled, don’t ya think? Yes, but also to get this:
 Doug at work.
We had to do this:


So the next time you go and give yourself a hard time because your house doesn’t look like a magazine or Pinterest or whatever, remind yourself that behind the gorgeous island in the photograph is hiding a pile of crap. We spent a lot of our time during this photo shoot moving everyday stuff and kid’s toys, and just stuff. And that is life and good design in my book: design a house for playing in, for laughing in, for loving in, for hosting in, for spontaneous dance parties and tons of guests, and lego exploding everywhere. Design homes for living in. And have some space to hide all of it when you want to do a fancy photo shoot. I feel like this was a success for exactly that reason: my clients are happy, they host huge dinners, they have dance parties, they have lego everywhere. And they’ve recently gotten in touch so that I can help them with the last little details: rugs and stools for the island, curtains for the front window, cushions, art on the walls. All the things that will warm up this space.
I guess that means that there will be a Mile End Project part 5? A reveal of the reveal? Maybe I can talk them into a rooftop master suite, keep this project going a little longer…
xa

Love it! Gorgeous. Thank you for the shots of the toys stashed out of view too, that’s really what it’s all about!
Thanks for reading!
I love this Annika – its a beautiful project, the spots of colour are perfect