I have been a bad, bad blogger. April has literally knocked me and my family on our collective butts. Not only has winter stuck around FOREVER but we have all been sick with colds, stomach flus, viruses. The works. I have had one or both children home from the cesspool/daycare multiple times a week. And I have been super sick too, catching all the said cesspool/daycare germs. This has meant that on the few days off from illness I’ve had, I’ve needed to work my ass off to catch up. So no time for writing or any other pleasure pursuits. But today: the kids are off to school, the snow has finally melted, I am avoiding doing my taxes, and I want to catch you up on the big advances to my Mile End Project. There is almost nothing as exciting and as scary as the demolition portion of a renovation. On the one hand it means that you are starting, that you are soon going to see the space in a clearer way, that all those sketches and ideas and all the research is coming to fruition. On the other hand it is terrifying because YOU NEVER KNOW 100% WHAT IS HIDING BEHIND THOSE WALLS. In the case of the Mile End Project that I have been working on since the Fall, the demolition went better than I could ever have hoped for. Were there surprises? Absolutely. But in general they were good ones or easily fixable ones. Were there delays? Hell yes. But none of them were my crew’s doing: all the delays were on supplier’s ends and none of those delays were for more than a week. All told a pretty magical reno. I thought I’d share some before, during, and still going pictures. Before: 

 The goal here was to open up the majority of the ground floor. We were creating a mudroom, a powder room, and a laundry room but the remaining space was getting opened way up. To do so we needed to remove 25 feet of wall. Now you can’t remove the middle wall of a house without putting something in it’s place. In this case that was a 25 foot steel beam. Demo:
 Walls are down, beam is up. One of the big surprises that came up was that the house’s existing structure was pretty shaky. Something you can’t know unless you open the ceilings and floors up. Because we were doing work in the basement/crawlspace and we were opening up the ceiling towards the second floor, we were able to see just how iffy the previous renovations were. Fixing these problems meant adding a couple more beams along the staircase ceiling. So yes, my clients had to invest more money into the project for the stair beams, BUT, and this is a big but, we were able to give them a way more solid & safe construction than they previously had.
  The new beams around the stairwell. The plumbing stack you see in the centre was moved and tucked into the wall. Windows: Once the beam was up and the walls were torn down it was time to build new walls and add new windows. The small former den window was becoming a 7 foot wide by 8 foot high patio door. The former kitchen window and backdoor were becoming an 8 foot wide by 5.5 foot high window (2/3 fixed and one openable 1/3). We wanted an industrial look for the patio door and the large dining room window. We went to Alumilex. They had the style we wanted, they very patiently put up with me changing the dimension of the patio door 3 times, and more importantly, they delivered on time.
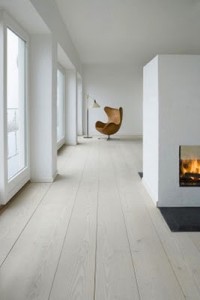
 Love love love. Floors: Another big issue to deal with was the flooring. Challenge# 1: the existing hard wood was different room to room which can be fine if you have a bunch of small rooms but since we were tearing down walls to create a large open space, we would have had a hell of a job matching the different floor boards. Challenge #2: my clients wanted heated floors in the kitchen. You can’t put hard wood over top of radiant heating. I had been toying with concrete or even tile in the kitchen but as the space was so long (25′!!!) and as it was open to the dining and living rooms, the seam or connection between the spaces kept bothering me. How would one space blend into the other? It felt wrong to try to open up the whole ground floor but then to create such delineated and separate spaces with the flooring. And then we met Sébastien Boucher. Recommended to me by two trusted sources, I checked out his company Monticello Floors. I was worried that he only did fancy mansion style floors at first but when I showed him some Pinterest pinned floors that I loved, not only did he get it, it turns out that he actually made some of those floors himself! What we were going for:


 Sébastien had a solution for our heated floor challenge.
Annika Krausz
DESIGN D’INTÉRIEURS
© Annika Krausz.Tous droits réservés.

Suivez-moi sur Pinterest
Dessiné par Annika Krausz
Site réalisé par Bonjour tout le monde
Abonnez-vous au flux RSS
No comments yet.